
ONE DAY INSTALLATION AVAILABLE IN YOUR AREA
Choose a worry free professional install where we handle everything, or choose DIY friendly delivery nationwide. Either way, you get a clear plan and real guidance so your shower fits your space and your needs.
Want a worry free one day installation plan for your bathroom layout?
Request worry free one day installationTip: If you already have measurements, include your opening width, wall to wall depth, and drain location when you request a quote.
Wheelchair Accessible Shower Size Guide: Real Dimensions That Actually Work
If you are searching for wheelchair accessible shower size, you are probably not looking for a vague answer. You want dimensions you can trust, plus a simple way to know if a shower will feel comfortable in daily use. However, the hard part is that shower “size” is not just the pan. It is the pan, the opening, the approach space outside the shower, the turning space, and the way the drain and slope work together. Because of that, the smartest plan is to size the entire “use zone,” not just the footprint on a spec sheet.
In this guide, we will break down practical roll in shower dimensions, show which sizes work in common bathrooms, and explain the real world layout choices that prevent regret later. We will also cover barrier free entry details, trench drain layouts, shower seat placement, and how to keep the project predictable whether you choose a one day installation or a DIY approach with your own contractor. Most importantly, we will translate numbers into outcomes you can feel, like easier entry, better turning, and less caregiver strain.
Quick answer: what is the best starting size for a wheelchair accessible shower?
If you want a practical starting point that fits many homes, a 60 x 36 layout is often the baseline because it can replace a standard tub footprint. Still, many wheelchair users feel more comfortable with extra depth or width. Therefore, 60 x 48 is a common upgrade for maneuvering, and 72 x 48 is a strong choice for larger users, caregivers, or bariatric needs. In addition, the entry details and open floor space outside the shower frequently matter more than “one size bigger” inside the shower.

Why wheelchair accessible shower size is more than the pan
Many people start by searching “what size shower do I need,” and then they get stuck comparing a 60 x 36 pan versus a 60 x 48 pan. That is understandable. Yet, in practice, the pan is only part of what makes a shower accessible. For example, a shower can be large on paper but still feel tight if the entry is narrow or the approach space is blocked by a vanity. Conversely, a slightly smaller shower can feel more usable if the entry is wide, the floor is clear, and the layout supports a clean approach.
To avoid wasted money, you need to plan three zones: (1) the shower interior, (2) the entry and threshold zone, and (3) the approach and turning zone. When you size these zones together, you choose a shower that supports real movement. In addition, you reduce the risk of installing the “right product” in the “wrong layout.”
The three zones that determine real accessibility
1) Interior zone (inside the shower)
- Clear floor area for the chair and feet placement.
- Seat placement that does not block entry.
- Shower valve location that can be reached safely.
- Soap shelves positioned to avoid leaning.
2) Entry zone (the “problem area”)
- True barrier free or low threshold entry design.
- Slope that feels stable, not steep.
- Drain style that keeps water controlled.
- Opening width that supports a clean approach.
3) Approach and turning zone (outside the shower)
- Space to line up and enter without scraping knuckles.
- Turning space that fits your chair and your habits.
- Door swing and vanity clearance that do not trap you.
- Room for caregiver help when needed.
Outcome you want
- Entry that feels easy, not stressful.
- Less water management drama.
- Less fatigue during daily routines.
- A shower that still works years from now.
Most common roll in shower dimensions and what they are best for
The simplest way to compare sizes is to match them to real use cases. While every bathroom is different, certain dimensions show up again and again because they align with common remodel constraints. In addition, manufacturers build these sizes because they work with typical framing and drain choices. Below is a practical comparison table. Unlike the broken dark table you saw earlier, this one is built for readability first.
| Shower size | Best use case | Why it works | Watch out for |
|---|---|---|---|
| 60 x 36 | Tub replacement, compact bathrooms | Often fits without moving walls, predictable remodel path | May feel tight for full wheelchair entry unless entry and approach space are excellent |
| 48 x 36 | Small bathrooms, tight remodels | Useful when the goal is barrier free entry in limited space | Approach space becomes critical, and seat placement must be planned carefully |
| 60 x 48 | Comfort upgrade for most users | Extra depth improves maneuvering and caregiver support | May require minor framing changes depending on existing tub alcove |
| 72 x 48 | Large users, bariatric needs, assisted bathing | More room for turning inside and safer transfers | Needs more bathroom space and careful drain planning |
| 60 x 34 | Narrow alcoves where every inch matters | Can be a smart compromise for remodeling constraints | Entry and controls must be optimized to prevent a cramped feel |
Real world note: many people “buy bigger” and still feel stuck because approach space outside the shower is blocked. Therefore, always measure the opening area and the space in front of the shower before you decide.

Barrier free versus low threshold: what your body will notice
People often ask whether a true barrier free entry is required, or whether a low threshold is “good enough.” The honest answer depends on daily use. If full wheelchair roll in access is the goal, barrier free entry is usually preferred because it removes the bump at the entry. However, low threshold designs can still support accessibility while helping with water containment. In addition, some low threshold pans have beveled edges that feel smoother than a hard curb.
Since you asked for a useful page, here is a simple way to decide. If you routinely roll directly into the shower, barrier free matters more. If you transfer to a seat and then step or pivot, a low threshold can be fine. Even so, planning for the future is wise, because needs often change. Therefore, when in doubt, choose the entry design that reduces effort rather than adds it.
Entry decision guide (fast and practical)
Barrier free entry is usually best when
- You want full wheelchair roll in access.
- You want the smoothest entry with minimal push effort.
- You want the easiest caregiver assisted rolling access.
- You want the most future proof solution.
Low threshold is often fine when
- You transfer to a seat before showering.
- You want more built in water containment.
- Your bathroom layout limits full barrier free conversion.
- You prefer a slightly raised edge for water control.

Turning space and approach space: the invisible reason some showers feel tight
When accessibility projects fail, it is often because the shower was planned in isolation. The approach path to the entry is just as important. For example, if you cannot align your chair with the opening, you end up fighting the entry angle. Then, even a large shower can feel difficult. Therefore, measure the space in front of the shower, including door swing, vanity projection, and toilet clearance.
Turning space also matters. Some users do not need a full turn inside the shower, because they back in or transfer. Others prefer a turn to face the controls. In addition, caregiver help can require additional clearance. So instead of chasing a universal number, plan for your habits. If your habits change, you want the layout to still make sense.
A simple way to test your layout before you buy
If you want a quick test that costs nothing, tape the shower footprint on the floor and simulate entry. Then, tape the opening width and roll up to it. Next, test how you would move your chair, hands, and feet. If you feel forced into awkward angles, you likely need a wider entry, more approach space, or a different drain and slope strategy. This simple test saves a lot of frustration later.
Drain location and slope: the part most people forget until water becomes annoying
Drain location impacts how the floor slopes. That slope changes how stable the floor feels when rolling or transferring. In addition, drain choice affects how water behaves at the entry. A center drain often uses a four way slope, while an end drain can simplify slope direction. Moreover, trench drain designs can pull water away quickly and keep the entry zone calmer. Therefore, drain planning is not “plumbing only.” It is usability.

Seat placement that feels real, not gimmicky
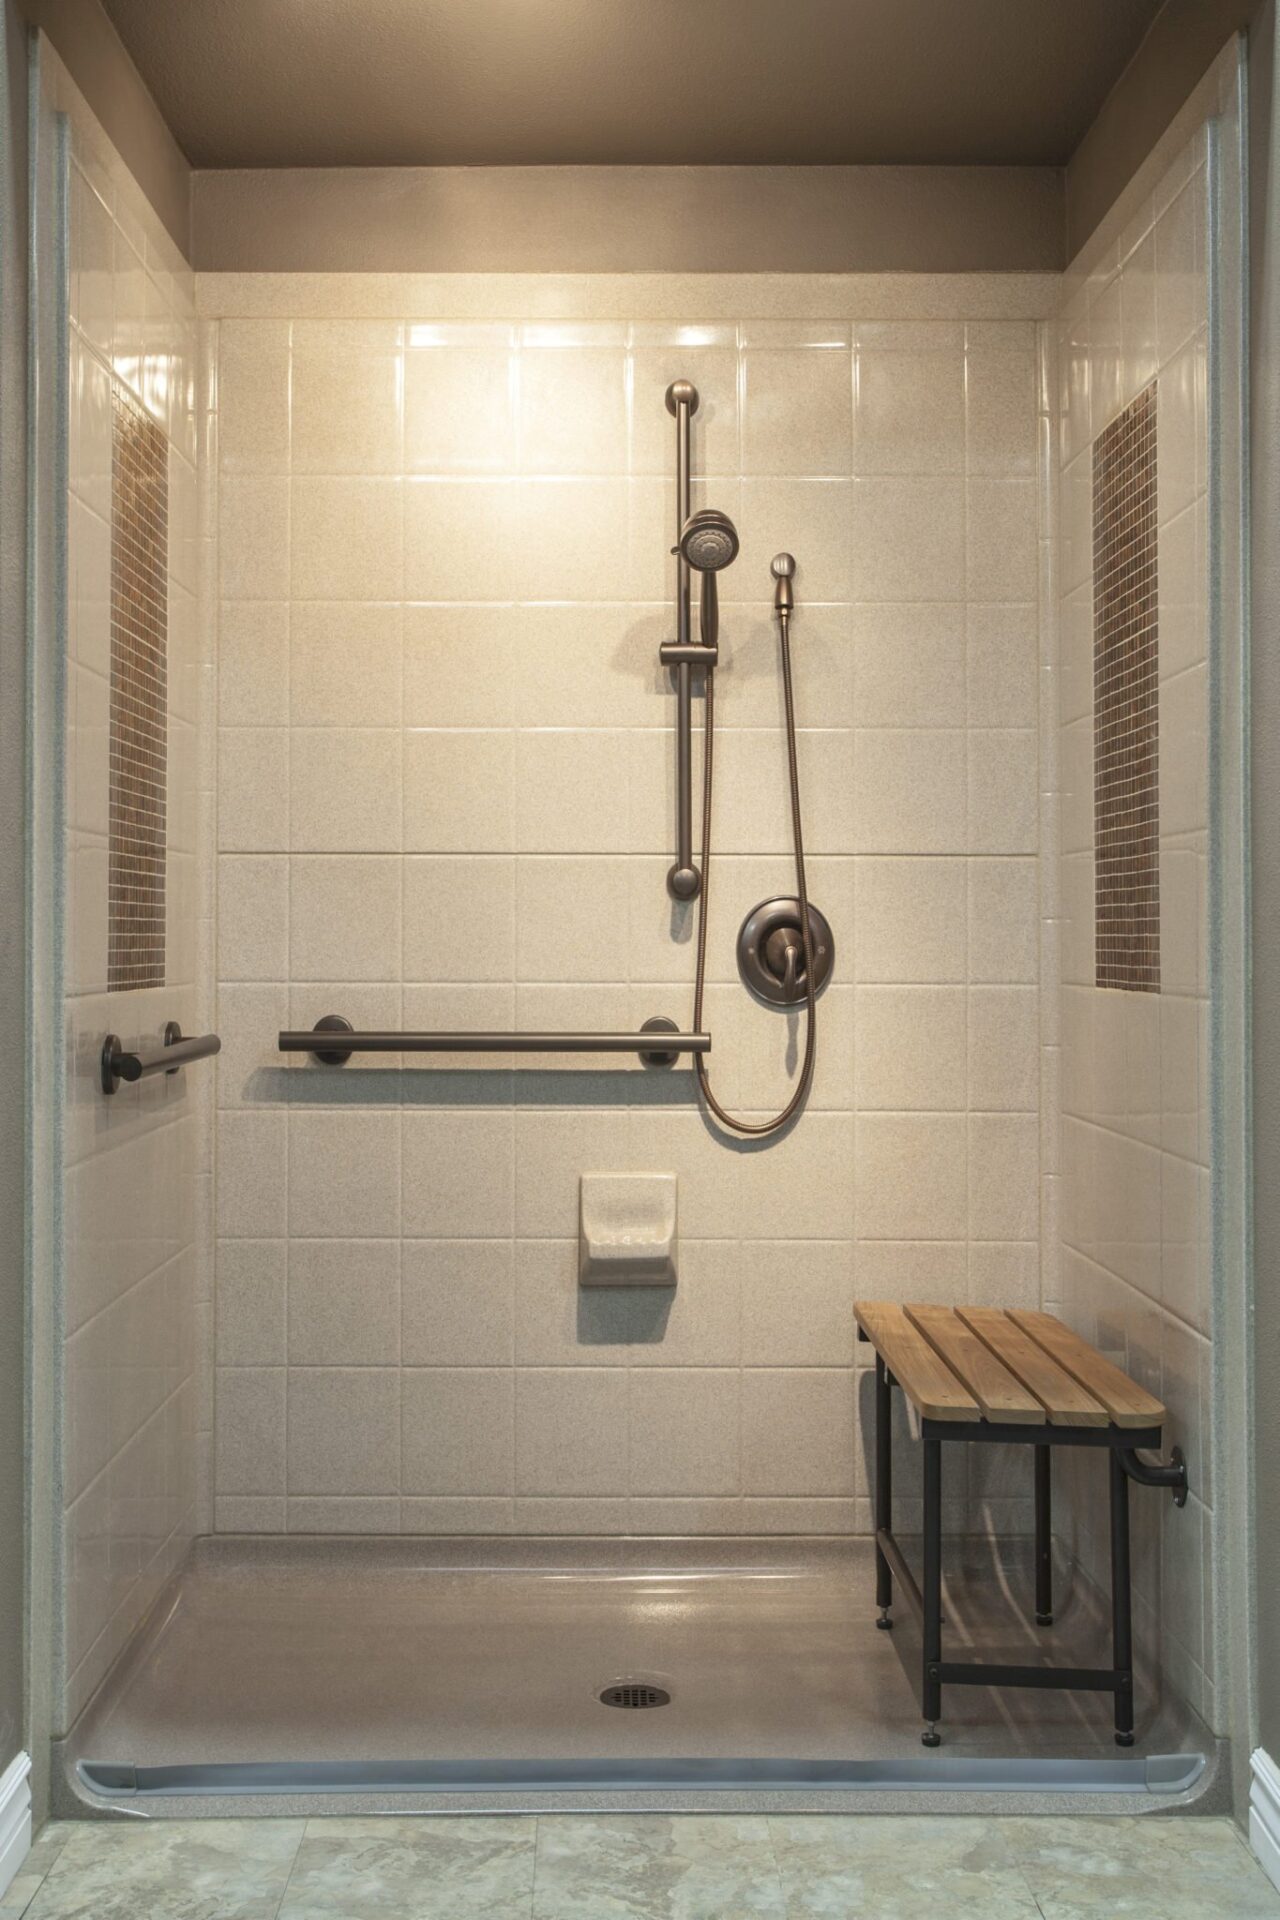
Seats are one of the biggest quality of life upgrades in an accessible shower. Still, they need to be planned. If the seat blocks the entry, it can create a frustrating bottleneck. Conversely, a well placed wall mounted fold down seat can make transfers easier while preserving clear floor space. In addition, the seat style can match the home, which matters for many families.
A practical approach is to plan the seat in relation to the controls. Ideally, the user can sit and reach the handheld shower and valve without twisting. Likewise, shelves should be reachable without leaning far. If you are designing for a caregiver, leave room for safe positioning. Finally, keep the entry zone clean, because entry is where most stress happens.
Recommended sizes by user scenario (so you can decide faster)
If you want a more direct answer, the table below maps shower sizes to real scenarios. This is not a rigid rule. However, it helps you choose a direction quickly. Moreover, it prevents the common mistake of buying “the smallest possible” and then paying for a second remodel later.
| Scenario | Recommended starting size | Why | Best upgrade if possible |
|---|---|---|---|
| Standard tub replacement, moderate mobility limits | 60 x 36 | Fits many alcoves, often a clean remodel path | 60 x 48 for comfort and easier positioning |
| Full wheelchair roll in access, independent use | 60 x 48 | More depth for entry, chair positioning, and stability | 72 x 48 if bathroom allows |
| Caregiver assisted bathing, transfers and support | 72 x 48 | Extra space reduces strain and improves safety during help | Consider trench drain layouts for calmer entry zone |
| Small bathroom, still want accessibility improvements | 48 x 36 | Improves access when space is limited | Widen entry and optimize approach space outside the shower |
How to measure your bathroom correctly (without overthinking it)
Measuring for an accessible shower does not need to be complicated. Still, it does need to be complete. Start with the wall to wall opening where the shower will go. Then measure the depth available. Next, measure the clear floor space in front of the shower. Finally, note the drain location and any obstacles, like a toilet or vanity. If you do these steps, you eliminate most layout surprises.
Measurement checklist you can use right now
- Opening width: wall to wall at the shower location.
- Depth: finished wall to finished wall depth available.
- Approach space: clear floor area in front of the entry.
- Door swing: does it block the approach path?
- Drain location: center, end, or trench style plan.
- Water control: plan splash zones and a calm entry strategy.
- Seat plan: wall mounted fold down placement and reach to controls.

Cost and value: what you really pay for when you size up
People often assume that a larger shower automatically costs much more. Sometimes that is true. Yet, the more important cost is the cost of doing it twice. If a shower is too tight for real use, you may end up reworking it. That is why “right sizing” can be more cost effective than “minimizing.” In addition, a size upgrade can reduce caregiver strain, which is a real quality of life factor.
Larger sizes can also provide better resale appeal, especially when the design looks like a premium modern shower rather than a medical retrofit. Therefore, size decisions should include comfort and appearance. A well planned accessible shower can look like a high end upgrade while still being practical.
If you want help choosing the best roll in shower dimensions, we can map it to your bathroom.
Get a shower size recommendationSend your opening width, depth, and drain location for the fastest answer.
Accessibility upgrades that matter more than an extra six inches
Bigger can be better. Still, certain upgrades can create more comfort than a small size change. For example, a wider entry can reduce daily friction. Likewise, a better handheld shower setup can make seated showering easier. Also, smart shelf placement can prevent awkward reaching. Therefore, if you are on the fence between two sizes, consider whether your layout is limited by entry and approach space. If so, prioritize those upgrades.
High impact upgrades for accessible showers
Entry and approach upgrades
- Wider, cleaner entry path.
- Better slope and drain plan to keep the entry calm.
- Door and vanity clearance changes that improve approach.
Usability upgrades inside the shower
- Wall mounted fold down seat placed for reach and stability.
- Handheld shower on a slide bar for seated and standing use.
- Shelves and soap dishes within easy reach.
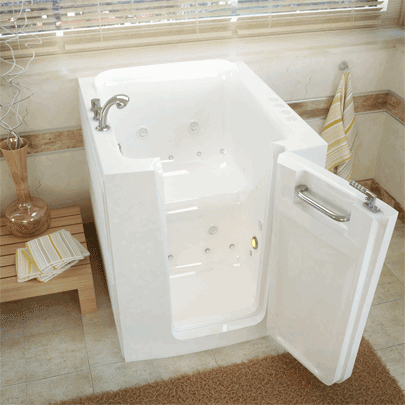
When a walk in tub makes more sense than a roll in shower
This is a shower focused guide, yet some families are weighing options. In some cases, a walk in tub is a better fit, especially when bathing rather than showering is preferred. For example, people with chronic pain sometimes prefer warm water soaking. In addition, hydrotherapy can be a priority for comfort and recovery. Therefore, it can be smart to compare shower accessibility with bathing accessibility, based on the person’s daily needs.
If you are exploring bathing options, here is one example that is helpful for context: HD Series 3060L / 3060BL walk in tub designed for lay down bathing . That page is not a shower solution, but it is a practical reference when families are deciding between a roll in shower and a walk in tub.
DIY friendly delivery versus worry free one day installation
After you choose a size and entry style, the project path matters. Some people want a professional one day installation because it reduces schedule risk and helps avoid mistakes. Others prefer DIY friendly delivery because they already have a contractor or a trusted installer. Both options can work well, as long as measurements and drain planning are handled correctly. Therefore, the best choice is the one that matches your timeline, budget, and confidence.
Which installation path fits you?
Worry free one day installation is ideal when
- You want a predictable schedule and less coordination.
- You want an expert plan for slope, drain, and waterproofing.
- You want fewer chances for measurement mistakes.
- You want the project handled end to end.
DIY friendly delivery is ideal when
- You already have a contractor you trust.
- You want flexibility in your timeline.
- You prefer to manage costs and choose your own trades.
- You still want product guidance while controlling the install.
Practical product examples to match your size decision
If you want real product visuals to match the sizes in this guide, the images below represent common layout directions. The key is to pick the size that supports your entry and approach space. Then, choose the drain style and seat plan that supports daily routines.


A simple “space reality” chart for decision making
Charts should be useful, not decorative. So, here is a straightforward visual. It is not a technical engineering chart. Instead, it shows how comfort generally increases as you move up in size, assuming entry and approach space are planned well.
Comfort and flexibility (typical experience)
48 x 36  | ███████░░░░  Compact, workable with strong layout planning
60 x 36  | █████████░░  Baseline tub replacement, common and predictable
60 x 48  | ███████████  Comfort upgrade, easier positioning and support
72 x 48  | ████████████ Maximum flexibility, ideal for assisted or bariatric use
Note: If entry and approach space are poor, comfort drops regardless of the pan size. Therefore, measure outside the shower as carefully as you measure inside it.
Common mistakes that cause regret (and how to avoid them)
If you want to avoid a fifth edit in real life, avoid these mistakes. First, do not pick a shower size without measuring approach space. Second, do not assume a low threshold is automatically barrier free. Third, do not place a seat where it blocks entry. Fourth, do not ignore drain and slope details. Finally, do not forget future needs. These mistakes are common, yet they are avoidable when you plan the full system.
Fast fixes that prevent common problems
- Widen the entry path if your chair cannot line up easily.
- Use a drain plan that keeps the entry calm and stable.
- Plan the seat for reach to controls and safe transfers.
- Choose the size that supports daily habits, not just minimum numbers.
- Pick an install path that matches your risk tolerance and timeline.
Frequently asked questions
What is the minimum wheelchair accessible shower size that still works?
What roll in shower dimensions are best for caregiver assisted bathing?
Is barrier free always better than low threshold?
Does a trench drain improve accessibility?
How do I know if my bathroom has enough approach space?
What is the best seat type for an accessible shower?
Should I choose one day installation or DIY friendly delivery?
Next step: choose the size that fits your real routine
If you take only one thing from this guide, let it be this. The best wheelchair accessible shower size is the one that supports your entry path, your daily movement, and your long term plan. Size matters. Still, layout matters more. Therefore, if you want a fast recommendation, use the quote option and include your opening width, depth, and drain location.